Daily Scheduler Calendar
![]() The Daily Scheduler is a web calendar that can be installed directly from the Adobe Dreamweaver's menu and that includes a web-based admin system to edit the entries and control the settings.
The Daily Scheduler is a web calendar that can be installed directly from the Adobe Dreamweaver's menu and that includes a web-based admin system to edit the entries and control the settings.
This calendar has the following features:
- Allows to create entries for each day, indicating, optionally, start and end times for each entry.
- Supports three types of entries:
- With both start time and end time defined
- Only start time defined
- Without defined start or end time
- Supports recurring events on weekly basis, ex.: all Mondays at 09.00 AM, all Saturdays at 10.00 PM, etc. Note: only recurring events of weekly frequency are supported, without exception, excluding any other type of recurring events (more information below).
- Can be used to visualize calendar entries on a public site, where additional information will be shown in floating panels.
- Can be used as a reservation calendar. If inserted into a reservation form, can be used as a date picker to select start and end dates.
- Includes an HTML (WYSIWYG) Editor, to edit calendar entries.
- Supports 12 hours (AM/PM) or 24 hours format.
New: Dreamweaver is no longer a mandatory requirement for this product. Beside a Dreamweaver extension, we are launching a version that can be used directly, without having to use Dreamweaver, just by copying the files and pasting the code into your webpage.
Includes three types of appearance on a website:
- Type 1: Small Calendar - only a small calendar is shown; rolling the mouse over a day, a floating panel is shown with the entries associated to that day, if any. This option is useful if you wish to locate the calendar in a sidebar or in a small area of the central content. Click the following link to see an example:
- Type 2: Large Calendar - shows a bigger calendar that occupies the main content of a page, where entries' titles are shown directly in the related day cells, while the remaining information is shown in floating panels, which appear once the mouse is rolled over the titles. Click the following link to see an example:
- Type 3: Reservation Calendar - to be used as a date picker in a web reservation form. Please click the following link to see an example:
All admin and visualization is made using modern Ajax technologies. This product does not require any programming knowledge or any hand coding.
»»» Click to open Admin Demo «««»»» Click to see Admin User Help Video «««
Tip: in the case of the Daily Scheduler, if you don't have a script that processes your reservation form to collect the data sent by the user, we can suggest any one of the following Dreamweaver extensions:
- PHP Form to Mail: Sends data to your email address
- PHP Form to Excel: Saves data in an Excel document and optionally sends it to your email address
- PHP Form to Database: Saves data in a database table and optionally sends it to your email address
REQUIREMENTS
IMPORTANT: This software has the following requirements:
- The server must support PHP 4.0 or later
- It's necessary to set writing permissions to the folder "DC_DailyScheduler/admin/database" where the data will be saved to. You can consult our FAQ if you are not sure how to proceed.
Optional requirements:
- If you want to use it as a Dreamweaver extension: Dreamweaver MX or later version (can be MX, MX 2004, DW 8, DW CS3, DW CS4, DW CS5, DW CS6, DW CC, ...)
Note: This product does not require external database systems; the information is kept in text files in a folder on your website. This way the technical requirements are low while the installation and use are kept simple and straightforward.
HELP & FAQ & VIDEOS
Please read below the "Basic Installation" and "Development Notes".
For visual information, please consult the animated video-demo.
For a live sample please visit the following links:
- Calendar Administration Console
- Public Calendar: Type #1
- Public Calendar: Type #2
- Public Calendar: Type #3
BASIC INSTALLATION
If you aren't using Dreamweaver then ignore the references to Dreamweaver below and follow the instructions specified into the "readme.txt" file located into the folder "Non-Dreamweaver version" (after unzipping the downloaded file). Basically just copy the files into your website.
To install in Dreamweaver, please follow these steps:
- Double click on the downloaded .MXP file. This will install the product in Dreamweaver.
- Restart Dreamweaver to complete the installation
- At this time you will have access to a new option in your Dreamweaver, which can be found under "Dreamweaver Menu >> Commands >> Insert Daily Scheduler"
To install the product in your page:
- Open the page where you wish to install your calendar. This page must be previously saved within your website.
- Use the option "Dreamweaver Menu >> Commands >> Insert Daily Scheduler", at which point the following window will appear:
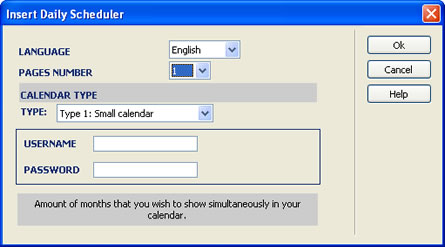
The window's fields are as follows:
- Language: Calendar language. At this time, the following languages are available: English, Spanish, French, Italian, German, Japanese, Portuguese and Dutch.
- Page number: amount of months that you wish to show simultaneously in your calendar.
- Calendar Type: Select what type of calendar you require; it can be "Type 1 - Small Calendar", "Type 2 - Large Calendar", or "Type 3 - Reservation Calendar", as explained previously.
- Username: Name of the user who will access the calendar's admin.
- Password: Password to access the calendar's admin.
- When you click on OK, the calendar will be inserted in your page, and all the relative files pertaining to the calendar's admin will be automatically created.
- Set writing permissions to the folder "DC_DailyScheduler/admin/database" where the data will be saved to. You can consult our FAQ if you are not sure how to proceed.
- You can now access the Admin System of the calendar at the following address: http://your-web-server/DC_DailyScheduler/admin
DEVELOPMENT NOTES
The address from which you can manage your calendar is:
http://your-web-server/DC_DailyScheduler/admin
or, if the calendar is not at the root of your website:
http://your-web-server/subfolder-1/subfolder-2/...../DC_DailyScheduler/admin
Keep in mind that you have to set writing permission for the folder "DC_DailyScheduler/admin/database" and to the files inside it. To know more details about how to set writing permission please read this entry in our FAQ.
About recurring events:
Please note that this calendar only supports recurring events that always occur the same day of the week, which means that the following kinds of events are supported:
- Every Monday at 9.00 AM
- Every Saturday at 10.00 PM
- etc...
The following types of events are NOT supported:
- Every second Monday of the month
- Every 5th of the month
- Every 5th of February, yearly
Managing the calendar:
Defining working days: Please mark the days that are available to add appointments, activities etc, as shown on this image:
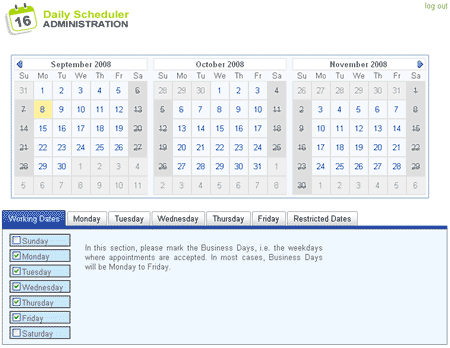
These days will be shown in the calendar as stricken through.
Defining appointment times: To define the time of appointments or activities, go to the day of the needed week (Monday, Tuesday...), where you will have the option to add each time independently (ex. Add Time at 8.00), or if you wish, you can generate, in one step, multiple appointment times for each interval (ex. add starting at 8 AM, every 30 minutes, 5 times; this will generate the sequence: 8.00, 8.30, 9.00, 9.30, 10.00). The following image shows both options:
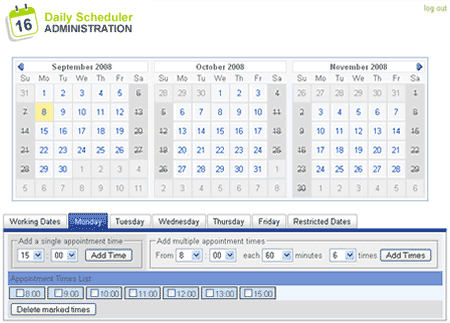
To delete times, mark them and use the button "Delete marked times"
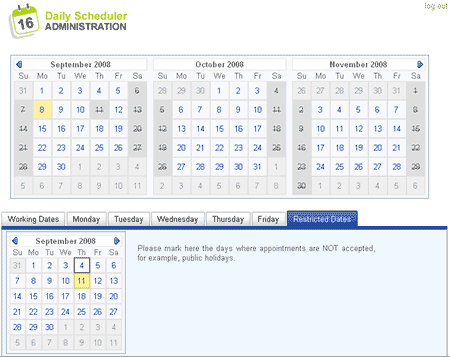
Adding restricted dates: Special days where no appointments or activities will be held, can be entered individually through this opton. Simply click on them to make them as "restricted" and if you wish to "un-restrict" them, simply click on them again. The following image shows the interface for these actions:
Adding information to the calendar: After defining the working days and the schedules you can use the calendar that appears in the upper part to add information on the activities that occupy the established times. For that, click on the desired day and the list of pre-defined times will be shown. Click on the start and end times (date range) and a window will appear where you can enter the title of the activity / appointment and a description, as shown in the following image:
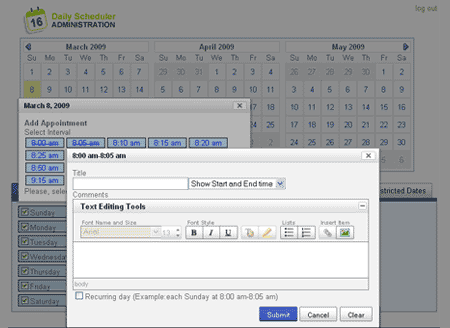
As you can see, all the work is realized on a single page, which is highly interactive, done in real time with comfortable effects based on modern dynamic scripts.
Changing the visual presentation:
If you wish to modify colours, fonts, size and other calendar styles you can do it by editing Cascading Style Sheets files (.CSS) that define these parameters. These files can be found in these locations:
- For the main styles: DC_DailyScheduler/DCDailyScheduler.css
- For general styles: DC_DailyScheduler/calendar.css
We recommend that you make a backup copy before modifying these visual styles.
|
Preferred payment & download method:
|
|
| Paypal or Credit Cards: |
PRICE
After payment you will be redirected to a direct-download page and the download link will be emailed to the payment address.
USD $59.99 |