Dreamweaver Event Calendar with MySQL Database
![]() Event Calendar with MySQL Database is a special version of the original Dreamweaver Event Calendar, that uses MySQL databases instead the plain text database used in the original version.
Event Calendar with MySQL Database is a special version of the original Dreamweaver Event Calendar, that uses MySQL databases instead the plain text database used in the original version.
Important: Note that this special version is sold as a separate extension. However if you have purchased previously the original Event Calendar (with plain text databases) please contact us and we will provide you with an upgrade link for only us$30.00. Be sure to include the email address used for the previous purchase in your contact message.
Event Calendar with MYSQL can be easily adapted to all kinds of purposes. You can manage and show information in many different ways. Initially it was designed as a calendar for events, but several features were added to it and now it can be used perfectly for activities, appointments, bookings, links, or simply to show information associated to specific dates and/or range of dates.
New: Dreamweaver is no longer a mandatory requirement for this product. Beside a Dreamweaver extension, we are launching a version that can be used directly, without having to use Dreamweaver, just by copying the files and pasting the code into your webpage.
This Calendar has the following features:
- Works over a MySQL database
- Associate a floating panel to each day or range of days; the panel will show information related to these dates. Otherwise, you can assign a direct link to a date, so that your website users are automatically redirected to a specified URL when they click on a certain date.
- Floating panels can be shown by either by clicking on the date, or by pointing your mouse on the date (mouse over). You can also associate both links and floating panels to each date, at the same time.
- Each date can have one or more events, which can be differentiated by using independent colors, which you select yourself.
- The information in the floating panels is edited using an HTML Editor, which allows to format your data to any way you like, quite simply.
- All the administration and visualization is achieved using modern Ajax technologies, which renders this product user friendly and comfortable.
DEMO (Public site)
Here is a demo of the calendar that will appear in the public site(beside this text) and a demo of the administration interface(below this text).
Check this video demo to see a sample of how it can be managed.
To see the changes applied from the administration area applied to the "public site calendar" you need to refresh this page.
DEMO (Administration console)
REQUIREMENTS
IMPORTANT: This software has the following requirements:
- The server must support PHP scripts
- MySQL 3.23 or later versions.
Optional requirements:
- If you want to use it as a Dreamweaver extension: Dreamweaver MX or later versions (can be MX, MX 2004, Dreamweaver 8, CS3, CS4, CS5, CS6, CC, ...)
INSTALLATION AND USE
If you aren't using Dreamweaver then ignore the steps from #1 to #4 below and follow the instructions specified into the "readme.txt" file located into the folder "Non-Dreamweaver version" (after unzipping the downloaded file). Basically just copy the files into your website and start reading from the step #5 below.
To install from Dreamweaver, follow these steps:
- Double-click the .MXP file to install it within Dreamweaver (only required to do once, to install it)
- Restart Dreamweaver (required only the first time, after the installation)
- Open the page where the calendar is going to be inserted and seen by your website visitors.
- Insert the calendar from the menu "Dreamweaver Menu >> Commands >> Insert Event Calendar"
The following window will appear:
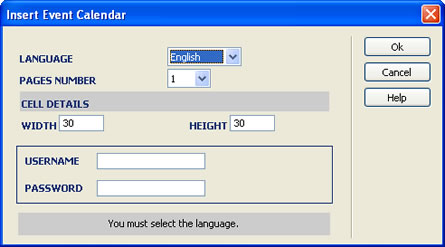
The fields to fill in are as follows:
- Language: Language in which the calendar will be shown. Currently included are: English, Spanish, French, Italian, German, Japanese, Portuguese and Dutch.
- Pages Number: You can choose that the calendar appears with more than one months shown in a single view.
- Cell Width & Height: Width and Height of each calendar's cell: this allows you to control your calendar's size.
- Username & Password: Need to be entered in order to securely access your calendar's administration panel.
- Click OK in the previous dialog to generate the calendar files.
- Specify the database access details into the "DC_EventCalendar/admin/config.inc.php" (click for details).
- After this final step, upload your page and all generated files onto your web server.
- The address from which you can manage your calendar is:
http://your-web-server/DC_EventCalendar/admin
or, if the calendar is not at the root of your website:
http://your-web-server/subfolder-1/subfolder-2/...../DC_EventCalendar/admin
The interface to enter data into calendar is truly simple, you can see a practical example of the entire process in this animated demo.
The fields to fill in for each event are:
- Title: This is the title of the floating panel with the relevant information.
- Description: Contents of the floating panel.
- Select Interval: Select a day and a range of days for the event. The first click indicated the first day, the second click indicates the final day.
- Show Tooltip on ...: Select, in this field, whether you want the floating panel to be shown when mouse is moved over the cell in question, or only when the cell is clicked on.
- Goto the URL ...: If you want your users to be directed to another URL when they click on a certain date, enter the relevant URL in this field. Here you can also decide whether you want that URL to be opened in the same window, or in a new one.
- Select Colors: Select the color for the event.
An example of how it is seen on a published website:

DATABASE CONFIGURATION
First you must create a MySQL database. It can be a blank MySQL database since the required tables will be created automatically by the calendar scripts when needed.
To specify the database access details for the calendar open the file "DC_EventCalendar/admin/config.inc.php" and in the first lines you will see:
define("DC_MYSQL_HOST","localhost");
define("DC_MYSQL_USER","DATABASE USERNAME HERE");
define("DC_MYSQL_PASSWORD","DATABASE PASSWORD HERE");
define("DC_MY_DATABASE","DATABASE NAME HERE");
The first parameter is the MySQL hostname, usually "localhost" unless your hosting provider specifies a different hostname for MySQL. The remaining parameters are (as the text suggests) the database username, database password and database name. Put there the correct access values for your database and be sure that the database user has privileges to create new tables.
|
Preferred payment & download method:
|
|
| Paypal or Credit Cards: |
PRICE
After payment you will be redirected to a direct-download page and the download link will be emailed to the payment address.
USD $59.99 |