Multi Availability Calendar with MySQL Database
![]() Multi Availability Calendar with MySQL Database is a special version of the original Multi Availability Calendar, that uses MySQL databases instead the plain text database used in the original version.
Multi Availability Calendar with MySQL Database is a special version of the original Multi Availability Calendar, that uses MySQL databases instead the plain text database used in the original version.
Important: Note that this special version is sold as a separate extension. However if you have purchased previously the original Multi Availability Calendar (with plain text databases) please contact us and we will provide you with an upgrade link for only us$30.00. Be sure to include the email address used for the previous purchase in your contact message.
Multi Availability Calendar with MySQL Database is an extension for Adobe Dreamweaver that allows to install a Calendar that displays, and allows to edit, availability for multiple items or persons (rental properties, rooms, cars, bikes, boats, planes, professionals available on daily basis, such as drivers, guides, teachers, caterers, entertainers, etc), thus permitting to offer a quick overview of days that are booked and days that are available - all in a single calendar.
New: Dreamweaver is no longer a mandatory requirement for this product. Beside a Dreamweaver extension, we are launching a version that can be used directly, without having to use Dreamweaver, just by copying the files and pasting the code into your webpage.
For instance, the following could be a calendar showing availability of several rental properties:
In this calendar, the red bars indicate the days that are already booked for each property
The main features of this calendar are:
- Works over a MySQL database
- Two modes: "Availability Mode" and "Booking Mode":
- The "Availability Mode" can be used on any webpage just to show the level of occupation of different items;
- The "Booking Mode", in addition to showing the occupation level, allows to insert the calendar inside a booking form, where users can select start and end day of their reservation from the days that are shown as available.
- Includes an administration area to define unavailable days, with the following features:
- Possibility to choose different colors to indicate unavailable days, for example holidays can be shown differently than booked days; or, some specific bookings can be shown differently;
- Additional data can be entered for each booking for administrator's perusal, or optionally, you can decide to show these additional data in form of dynamic floating panels on public calendars (in both booking and availability modes). This can be useful, for example, to show to the users the reasons why some items are not available, or just to have a quick reference of reservation data for the administration;
- The administration interface, as well as the public calendar, use Ajax technology, which makes this extension more modern and comfortable in use;
- The administration interface requires PHP on your web server, but the public calendar, made with Ajax, can be inserted in a page with .HTML extension, or any other extension. In any case, the server must support PHP scripts;
- Allows to place links to the days of the calendar and select what exactly should trigger the floating panels to appear - click or mouseover;
- This calendar is based on HTML / JavaScript / CSS, which allows you to edit the CSS styles files and adapt the calendar to your design, without the need for any external plugins;
- Low server and software requirements.
For more details please have a look at the following demo's:
- Demo of the Admin Area.
- Example of a calendar in Availability Mode.
- Example of a calendar in Booking Mode.
In addition, check out this video for a quick guidance on how to install and use this product:
- Video / Tutorial: Video on the installation and use of the product.
Requirements
The following is required:
- Your web server must support PHP scripts version 4 or later.
- Your web server must support MySQL 3.23 or later versions.
Optional requirements:
- If you want to use it as a Dreamweaver extension: Dreamweaver MX (6) or later versions (MX, MX 2004, DW 8, CS3, CS4, CS5, CS6, CC, ...)
Demo: Public calendar in "Booking Mode"
Demo: Admin Area
Note: Check the video on the installation and use of the product.
Important note: To see the administration changes applied into the "public" calendars above you must refresh this page.
Installation
If you aren't using Dreamweaver then ignore the references to Dreamweaver below and follow the instructions specified into the "readme.txt" file located into the folder "Non-Dreamweaver version" (after unzipping the downloaded file). Basically just copy the files into your website.
To install the extension in Dreamweaver, you can double click the downloaded .MXP file, or alternatively, open the Adobe Extension Manager and open the .MXP file from there.
After this initial step, restart Dreamweaver and a new item will show up in your menu "Dreamweaver > Commands > Insert Availability Calendar".
Use
Note: This video/tutorial shows a practical sample.
To insert the calendar into your web page, first open the page where you wish to insert it, - make sure this page is saved within your website! - then use your Dreamweaver menu option "Commands >> Insert Availability Calendar."
The following dialog window will be shown:
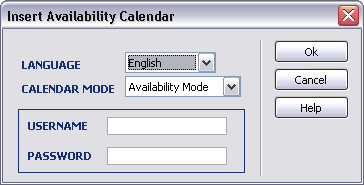
The fields that should be defined in this setup window are:
- Language: indicates the language of the public calendar. It can be: English, Spanish, French, Italian, German, Japanese, Portuguese and Dutch.
- Calendar Mode: Select if you wish to show the calendar in Booking Mode or Availability Mode.
- Username: user name to edit the calendar in the administration area.
- Password: Password to edit the calendar in the administration area.
From this point forward save your page and make sure to upload it onto your server, along with the folder DC_AvailabilityCal that will be generated automatically within your website.
Important Step: To specify the database access details for the calendar open the file "DC_AvailabilityCal/admin/config.inc.php" and in the first lines you need to specify the MySQL database access details. Read below in the "DATABASE CONFIGURATION" section.
The administration area can be accessed from the address http://your-web-site/DC_AvailabilityCal/admin
In addition there is an advanced administration system (optional) that allows to create new calendars and set them up directly from the web interface. That advanced admin system can be accessed from the starting page of your administration area.
DATABASE CONFIGURATION
First you must create a MySQL database. It can be a blank MySQL database since the required tables will be created automatically by the calendar scripts when needed.
To specify the database access details for the calendar open the file "DC_AvailabilityCal/admin/config.inc.php" and in the first lines you will see:
define("DC_MYSQL_HOST","localhost");
define("DC_MYSQL_USER","DATABASE USERNAME HERE");
define("DC_MYSQL_PASSWORD","DATABASE PASSWORD HERE");
define("DC_MY_DATABASE","DATABASE NAME HERE");
The first parameter is the MySQL hostname, usually "localhost" unless your hosting provider specifies a different hostname for MySQL. The remaining parameters are (as the text suggests) the database username, database password and database name. Put there the correct access values for your database and be sure that the database user has privileges to create new tables.
CAPTURING THE POSTED DATA (only if you are using it in "Booking Mode")
Sending to the server and data saving script are NOT included in this product, however, in this page we explain how you can achieve this using other products.
If you are writing by yourself the form's processing code, then you need to know that the calendar put the reservation dates into hidden fields to allow the selected data to be posted just like normal form's fields:
<input type="hidden" name="selMonthcal1" />
<input type="hidden" name="selYearcal1" />
<input type="hidden" name="end_selDaycal1" />
<input type="hidden" name="end_selMonthcal1" />
<input type="hidden" name="end_selYearcal1" />
<input type="hidden" name="DC_itemcal1" />
... where "cal1" is the calendar's ID and "DC_itemcal1" is the ID of the selected item. Then, to get those fields form a PHP code (example) you can use a code like this one:
<?php
// store the first date selected with the format YYYY-MM-DD
$startDate = $_POST["selYearcal1"]."-".$_POST["selMonthcal1"]."-".$_POST["selDaycal1"];
// store the second date selected with the format YYYY-MM-DD
$endDate = $_POST["end_selYearcal1"]."-".$_POST["end_selMonthcal1"]."-".$_POST["end_selDaycal1"];
// selected item ID
$selected_item = $_POST["DC_itemcal1"];
?>
|
Preferred payment & download method:
|
|
| Paypal or Credit Cards: |
PRICE
After payment you will be redirected to a direct-download page and the download link will be emailed to the payment address.
USD $69.99 |